Jack and the Beanstalk

Jack and the Beanstalk
Fairy Tales for Kids
Crafts
Chickens
Age 3 – 7
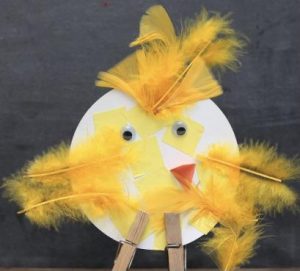
Supplies:
- Paper cut into a circle
- Double-sided tape or masking tape
- Googly eyes
- Orange diamond for the beak
- Yellow feathers
- Clothes pegs for legs (optional)
Instructions:
- Cut paper into a circle.
- Cut squares of tape.
- Using one side of the double sided tape, stick it over the paper circle.
- Stick on the eyes, beak and yellow feathers.
Duct Tape Wallet
Age 7 – 10

Supplies:
- Duct tape
- Ruler
- Scissors
Instructions:
- Pull some of the duct tape off the roll and lay it against a ruler with the sticky side up. Cut the strip off at 9 inches (23 cm) using sharp scissors.
- Try working on a piece of parchment paper or a plastic cutting board, which are resistant to the adhesive.
- Cut another piece of duct tape to the same length. Turn it so the sticky side is down, and then lay it halfway up the first piece.
- The sticky part is at the bottom of your strip. Fold it up along the edge created by the second strip, then seal it in place by smoothing it out with your fingers.
- Flip it over so the sticky side is up. Cut another piece of duct tape that’s the same length and lay it over the sticky part. Half of the strip will hang off, sticking to the surface below.
- Repeat the process of peeling the duct tape up, flipping it over, and adding a new strip of duct tape overlapping the sticky part. This will add length to the wallet a little bit at a time.
- It should be about 8.5 inches (22 cm), fold the sticky edge back over the rest of the wallet. That will make that edge solid for the wallet.
- Cut along the sides of the duct tape to even out the edge. Use a ruler to help guide and make a straight edge. Don’t cut too much off as the wallet will be too small.
- Bring the folded edge at the bottom up to meet the folded edge at the top. The sides will be composed of the clean edge. Make a crease along the bottom where the duct tape is folded.
- Cut pieces of tape that are the height of the sides of the pocket. Place a piece on each end, folding it over the cut edge and around the back. Smooth it out with your fingers
- Folding it this way will make it small enough to fit in a pocket. Make sure the edges meet, then use the ruler to make a crease along the edge.
To make a pocket:
- Measure out 2 strips of duct tape that are about the length of the wallet when folded. Place 1 piece with the sticky side up on the surface. Set the other piece on top, sticky side down with just 0.25 inches (0.64 cm) or so of overhang.
- Pull the tape off the surface. There should be a long, sticky overhang on each side. Fold those over on top of the rest of the duct tape, making a single strip with no sticky edges.
- Open the wallet and lay it out flat with the inside facing up. Place the first pocket 0.25 inches (0.64 cm) from the top of the wallet on 1 side. Cut out pieces of duct tape just wide enough and long enough to tape the sides and bottom of the pocket to the wallet.
- Place the second pocket on top of the first one but about 0.25 inches (0.64 cm) from the top edge of the first pocket. Tape it in place with small strips of duct tape on the sides and bottom of the pocket, leaving the top exposed.
- Add pockets to the other side on the inside. Do it the same way by making strips of duct tape and taping them in place in layers.
The Book Nook
The Book Nook has an eclectic assortment of gently-loved books. Adult Books are $5 each, Children and Ado books are $2 each. There are also some jigsaw puzzles for family fun.

We are now only accepting donated books in very good condition published since 2010. No textbooks or magazines please.
Internet Access

Use the library computers or bring your own.